
1.SECURITY
1.1.LOGIN
To log in to Shipeu you must go to http://shipeu.com where you will be asked for your username and password. In order to access to the system, the username must be activated.

1.2.PASSWORD RECOVERY
If you forget the password, you can recover it by clicking Forgot Password? There, you must enter your username or email address and then click on Reset password. A link to reset your password will be sent to your email.

2.DASHBOARD
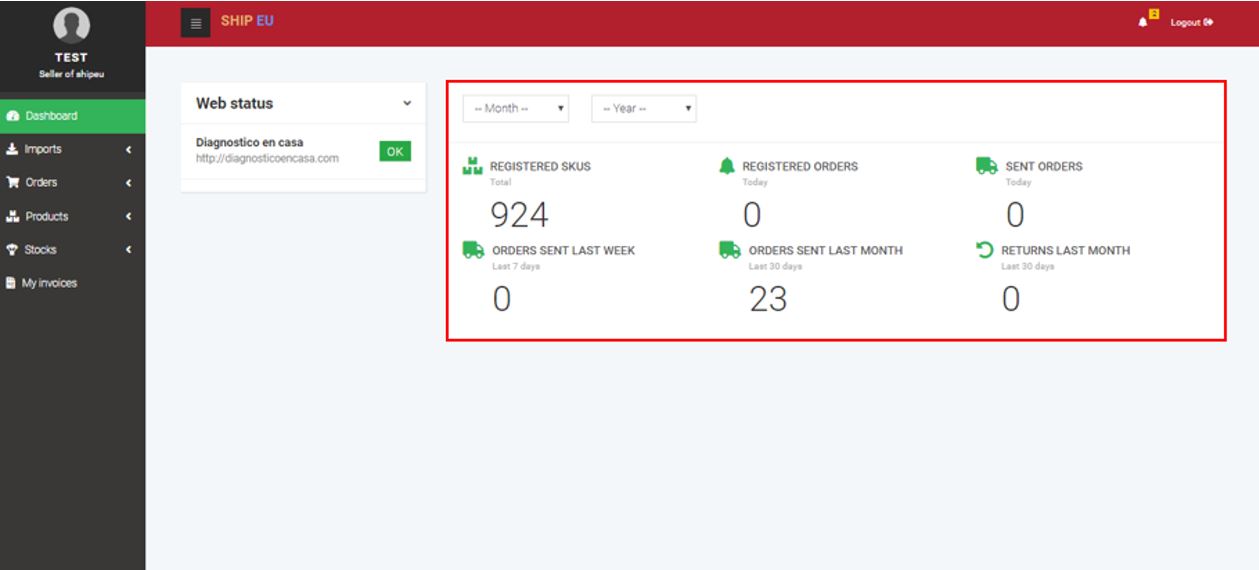
Once you have logged in, the first thing you will see is the Dashboard.
To access this section later, you must go to the sidebar menu and click the Dashboard item.

In the Dashboard you will see the Web status which show you the status of the connection to the seller’s web.

In the other side you have a filter to search for a specific year and a month of that year.
Under this filter you will be able to see some information such as:
- The number of registered SKUs which refers to the total amount of different products that the seller has registered.
- The registered orders, orders sent and orders sent the last week which are displayed according to the current date.
- And the last two fields, orders sent and returns will be displayed based on the selected date in the filter.
3.IMPORTS
You can access the Imports section by clicking the option under the Dashboard from the sidebar menu.

This section consists of the following items: Shipments, Trackings and Products.
3.1.SHIPMENTS
To access this item you must go to the sidebar menu and select the Shipments item under Imports section.

3.1.1.IMPORT SHIPMENTS
Here, you will find a form to import a shipment. To do so, you have the following options:

- In the Config option you must select the way by which the orders will be imported. This can be through a WebService, through a CSV file, generic file or manually.
- If you select a WebService, Shipeu will bring all orders that have not been imported since the last time.
The web services currently available to connect with Shipeu are:* Prestashop
* Woocommerce
* OpenCart
* Shopify
* MiraklFor more information on the connectors here.
- If you select CSV then a new option will be shown and you must upload the file.

- If you select Generic (CSV), the file you will upload must have the next columns:
 Every column of the CSV must be separated by a semicolon. If you need to leave a column empty, you can, but you must add the semicolon after the empty space, like in the example above with the column shipping_address_2 which has no data.
In the last column “line_items” you can specify the amount of products for each order, to do this, you must go to the line_items column and in there you will indicate the next format (as long as you need to add more than one product):
The number before the x refers to the quantity of the product, followed by its respective SKU code. Then, to add another product you must indicate a pipe symbol “|” to separate every product.In the example above you will have 1 unit of the product SKUCODE, 2 units of SKUCODE2 and 3 units of SKUCODE3.
- If you select Manual register, the Import button will change to New order button.
 When you click this button you will be directed to the New order shipment form. To refer this form click here.If the order was successfully created, the shipment you just created will appear in the table:
 Now that the config part is ready, you can continue to the next step (if you selected Manual register, this is all, if not, you must continue to the part 2) to import the shipment.

- If you select a WebService, Shipeu will bring all orders that have not been imported since the last time.
- In the State option you must select the status of the shipment that will be downloaded.
- In the last one you must select the Courier. If you select “All” then no filter will be applied for the courier. If you select another option, then all the orders will be downloaded (so the system can classify them) but only those that match the filter will remain.
- Finally, you have to click on the Import button.
In the Import history table, which is below the form, you will see the history of all imported shipments of the seller with their respective information.

In the Import status column you will be able to see the import status which can be Success, Warning or Error.

When the status is different from Success, you can click on the Warning or Error button and it will display a window with the information about the problem.
If the problem is that a product is not registered, then you must click on the Check not registered products button which will take you to a form to register the product.

Other problems may also occur, such as incorrect structure of the information returned by the Webservice, problems with downloading the orders, and so on.
- In the Imported data column, you have the option to download the previously uploaded file by the user.
- Once the orders have their respective tracking code and if the import status is successful, you must click on the Confirm shipment
- In the column Report type you can select the type of report you want to download.
- The column Download trackings allows you to get a file with the trackings of the selected shipment.

If you click in any row of the table you will see all the orders of that shipment:

Here, you can see the information about the shipment orders, such as the order id, shipped date, client name, country, the tracking code, shipped and payment method and service code which refers to the code for the courier. If an agreement was not reached with SpainBOX about a specific courier, the system has an internal configuration which will assign a courier according to the characteristics of the order.
Now, to see the details of every order, you can click in any order and it will display its information.
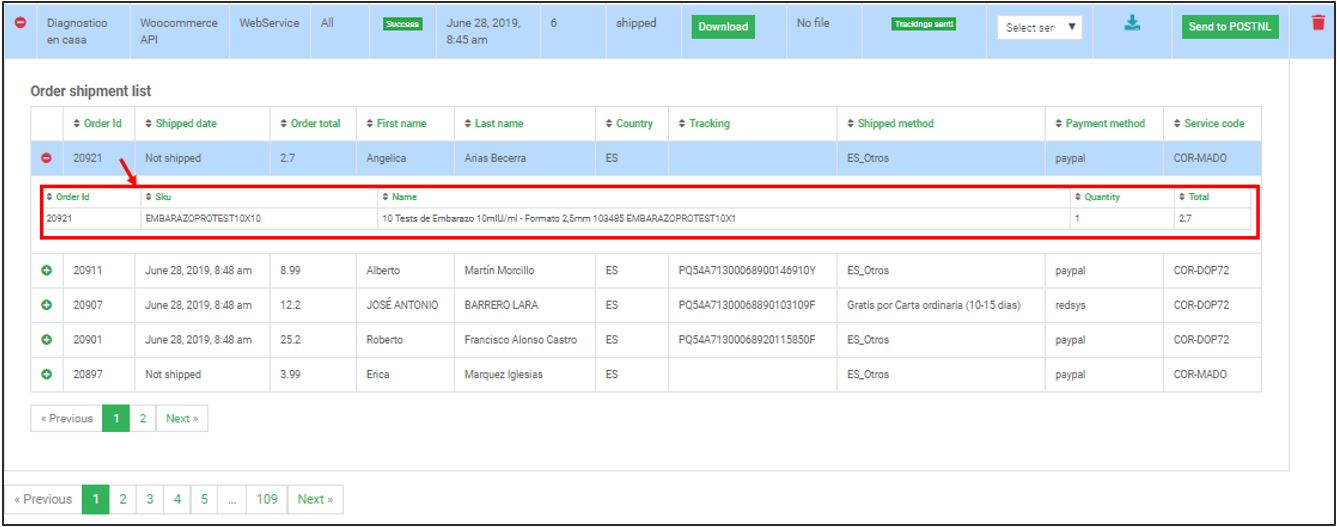
This will show some information such as the SKU of every product, the name and the amount of units of each product.
3.1.2.SEND TRACKINGS
Once the shipment orders have been downloaded, the seller will be notified that these shipping orders were processed and sent to the different courier services.
After this, a tracking code for every order will be generated. This code indicates that the shipment was effectively done.
Now, to assign every other its respective tracking code there are different ways you can make it:
- The first way is to take the order id, go to the sidebar menu and search for the Orders
- Then you must click on the Shipments
In the shipments form you must:
- Indicate the order id.
- Click on the check button.
- If the table shows a result for the given order id, go to the respective row and click on the edit button.

You will be directed to the Update order shipment form. In here, you must search for the “Tracking” field and indicate the given tracking.

The shipped date will be automatically filled when the shipment is sent. However, this date can be modified if necessary. The tracking sent date will be later automatically filled when the tracking is sent.
To finish, click on the Save shipment button. Now, the order will have its respective tracking code.
The other way to fill the trackings is by the Trackings item inside the Imports option from the sidebar menu. Click here to see this procedure.
Now that the orders finally have their tracking, you will be able to send them.
In the table you must look for the send trackings column and there, see the Send trackings button for the shipment order. Click on this button and it will send all the orders of the selected row, which have a tracking code to the Webservice that the seller has configured. This action will change the state of the shipment, from completed to shipped.

Once the trackings are sent, in the Send trackings column, the send trackings button will change to Tracking sent. Click on this button to display a window with a summary of the trackings.

The status can be sent or can be error.
Click on the Send trackings again if necessary.
The other way to fill the orders with the trackings, is by going to the Trackings page. Click here to see this procedure.
3.2.TRACKINGS
To go to the Trackings item you must go to the sidebar menu and select the trackings option inside the Imports section.

Here, you will be able to import a tracking file, so you do not have to make it manually.
When the orders are ready to be sent, SpainBOX delivers the products with their corresponding order id to the courier. The courier must generate a tracking code for every order and send a file with this information.
Now, this file is ready to be imported. To do so, you must:
- Select a sam report type. Every report type has a different structure so the system can recognize it and treat it. Each courier handles a different format for the files, so, you must select the format that your courier requires.
- Add the file sent by the courier.
- Click on the Import
Shipeu will process this information and bring an import status, which you can see in the table in the Import status column.

In the table below the form you will see the history of all imported trackings.

In there, you will see some information such as the import, start and end date, the number of orders of every shipment, the total ship price, the sam report type, the status of the import which could be Success, Warning or Error. If the status is different from Success, you can click on the Warning or Error button.

This will display a window with the information of the problem.

- If the import status is Success, it means that there was no problem with the orders and they are ready to be updated with their respective tracking code. To do so, you must click on the Update trackings This action will automatically update all the corresponding orders giving them their tracking number.
- In the download shipconfirm column you have the option to download the file with the order-id and tracking of the orders.
- In the next column, download imported file, you can download the data you previously uploaded.
- Finally, in the last column you will have the option to delete any file you select.

3.3.PRODUCTS
To see the list of products imported by the seller you must go to the sidebar menu and select the Products item that is inside Imports item.

In this section you will be able to import a file with products. To do so, you must click on Seleccionar archivo button and then select a file which has to be in CSV or TXT format.
This file must contain at least the columns sku, name and barcode and must be separated by one pipe (|). E.g.:

The available columns for the data of the product are showed in the table below

If you check the option “Are basic products?” you indicate that the products you are about to upload are going to be used by a master product.
If you desire to upload a product which is a combination of other products, you must, first of all, have previously created the basic products.
Then, to indicate the combination of products, the SKU code must look like this:

- You must use an underscore to separate the SKU code of each product.
- The numbers before the “x” indicate the units of each product.
This means that the 001xSKUCODE1 belongs to a product from which we are taking 1 unit. The 050xSKUCODE2 belongs to another product and from this we take 50 units. And so on with all the products that we are combining.
With this information, the system will create the new product and it will associate the products that we are indicating by the SKU. This is why it is important to have previously created all the products you desire to combine.
Finally, when the file is ready, you must click on the Import products button.

In the table Import history you will see all the files with products that you have imported.
You can click the Download button to get the file that you previously uploaded.
In the Actions column you will find an option to delete any row you select.

In the table Products you can see the detail of the files imported. So, you must click on any row from the Import history table and its information will be displayed.

In the Actions column you will have the options to edit or delete any product.
4.ORDERS
To access the Orders section you must go to the sidebar menu, search for the orders option and click on it.

4.1.SHIPMENTS
To see the list of shipment orders you must go to the sidebar menu and select the Shipments item that is inside Orders section.

Here you have the detail of each shipment order.
On top of the page you will see three buttons:

- The New order button will take you to the New order shipment form.
In this form you must add the information of the order shipment. All fields are optional except for order id, first name and address one, these are mandatory. Finally, click on Save shipment button or on Cancel button.

If you click on Save shipment you will remain in the same form except this time it will not be to create but to update.

When the order has been created, at the bottom of this page you will find an option to add products to the order.

Here, you must press the plus button (![]() ). This will show a window where you must select a product, then add a quantity and a total value.
). This will show a window where you must select a product, then add a quantity and a total value.
Click the Save button to add the product.

You will be able to see the product added in the table. You can edit it or delete it.

Here, you must indicate a value for every field and then click on Save.
2. The Export button allows you to export a report. This will display a window where you will have to indicate a range of dates, and then, click on Generate to download an Excel file with the report.

3. The Tracking status button allows you to update the tracking status of the orders of a given courier.
When you click in it, a new dropdown field with couriers is shown

In this field you can select a courier and, when you press the update button, a progress bar will be displayed indicating that the tracking status of each order shipped with the selected courier will be updated

When the progress bar is finished, you can see the tracking status in the table below

In addition, if you want to see more details about the tracking status, you can click in the eye button in the table showed above.

A new page will be displayed with the order details, in wich you must click on the Shipping events tab

And you will be able to see all the tracking info of the previously selected order

5.PRODUCTS
To access the Products section you must go to the sidebar menu and select the option Products.

5.1.ALL PRODUCTS
To display the list of all products of the seller you must select the All products item that is inside Products section.

Here you can see the list of all products of the seller.
In the Action column you will find the options to edit or delete any product you select.
To register products you must click on the Add product button.
This action will display the New product form in which you must fill all the fields of the form.
- The name is a short description of the product.
- The SKU is a unique code for each product and every store handles it differently.
- The barcode is an identifier which can be the same SKU.
- The ASIN is an identification number which is exclusively used by stores that are in amazon.
- The price is the value at which the product is sold to the end user.
- The cost is the value at which the store purchases its products.
- The stock is the amount of units that the store has of a product.
- In the pref courier service you can select the default courier by which the shipments that contain the product will be sent.
- The VAT is the Value Added Tax.
- In the check boxes you will check them according with the characteristics of the product (is basic product, is fragile, and is urgent).
- You must check the basic product box for those products which will be sold in combo but not individually.
- If you check the ignore stock option you will indicate that if a product is added, if there is a shipment or a return or any other movement, the stock of that product will not be affected.
- The keywords and bullet points are mainly used for amazon.
The only fields which are required are name, SKU and barcode. However, it is recommended to also fill the stock field.
Once you have added all the corresponding information you can click on the Save product button.

At the bottom of the form you will find a section called Products of the combinations.

You will be able to see this section only if you previously registered a product.
There are some products which can contain sub-products (only for stores in amazon). These products can be sold in combo with other products but can also be sold individually. To create these combinations of products you must click on the Add sub-product button.
A window will be displayed which contains the list of all products of the seller.
Here, you can search for a specific product, then add the desired quantity of it and click on the Add button.

All the products you select for the combination will be shown in the table.

When a combo of products is sold, the amount sold will be subtracted from the stock of the combo. And all the products of the combo will be subtracted from their respective stock.
5.2.WITHOUT STOCK
To see the list of all products without stock you must select the Without stock item that is inside Products section.

This section allows you to keep track of those products which run out of stock.
- Here, you can find the Add product button to register a new product.
- In the table you will the information of those products that have zero or less units.
- In the Actions column you will find the options to edit or delete any row.

5.3.NOT REGISTERED PRODUCTS
You must click the Not registered products item from the sidebar menu, inside the Products section, to see all the products that have not been created.

In this section you will see the list of products that are associated with a shipment, but which have not been registered.
In the Actions column you can click the add button which will take you to the New product form, so you can register the product.

You can also delete the product by clicking the red button.
6.STOCKS
To access the Stocks section you must go to the sidebar menu and select the option Stocks.
6.1.EXPORT STOCKS
In the Stocks section from the sidebar menu you will find the item Export stocks.

Here, you will be able to export a report with the information you select:
- In the export type you must select the type of report you desire: history, products stock or sent products.
- History: this option will display the information about the movements of the products selected. You can see the date when the product had movements, the stock it had before and the stock it had after the movement. And finally, you can see the current stock.

- Products stock: this option will display the current stock of the products.

- Sent products: this option will display the name of the product, the number of shipments of that product in a range of dates and the cost.

- In the next option you must select a seller. (You will only have the option to select the seller currently logged).
- In the third option you can indicate a SKU to search for a specific product.
- Select an initial date.
- Select an end date.
- Click on the Export button.

It will download a CSV file according with your selection.
7.MY INVOICES
To get to this section you must go to the sidebar menu and select the option My invoices.

In this section the seller will be able to see all its invoices.
You can also select a period of time (a year and a month) and click on the ![]() button to see the results.
button to see the results.
Other option to search for an invoice is to indicate an invoice number in the N° invoice field and click on the ![]() button.
button.
The ![]() button will clear all the fields.
button will clear all the fields.
In the table Invoices list you will see:
- Number of SKUs refers to the amount of different products that were sent.
- The number of items shows the total amount of products sent. (There can be more than one product sent from each SKU).
- The total to pay of the invoice.
- An option to download the invoice.

8.API CONNECTORS
Below are the APIs with which Shipeu can connect to communicate with your store and optimize processes.
In the Parameters column, are the data that you must provide to Shipeu to make the connection with your store.
| Platform | Description | Protocol | Parameters | Services |
| Prestashop | OpenCart is an online store management system. It is PHP-based, using a MySQL database and HTML components. Support is provided for different languages and currencies. It is freely available under the GNU General Public License. As of May 2016, 342,000 websites were using OpenCart. | REST | API Url
API Key |
|
| OpenCart | OpenCart is an online store management system. It is PHP-based, using a MySQL database and HTML components. Support is provided for different languages and currencies. It is freely available under the GNU General Public License. As of May 2016, 342,000 websites were using OpenCart. | REST | API Url
Secret Access Key API Username API Password Client ID (Only for OAuth authentication) Client secret |
|
| Shopify |
Shopify Inc. is a Canadian multinational e-commerce company headquartered in Ottawa, Ontario. It is also the name of its proprietary e-commerce platform for online stores and retail point-of-sale systems | REST | API Url
API key API Password API Shared Secret Location id (Id for the warehouse) |
|
| Mirakl | Mirakl is the most widely adopted marketplace software, allowing businesses to quickly expand their product or service offering and gain more control over third-party fulfillment. | REST | API Key: The API Key is generated on the API Key tab in ‘My User Settings’ page on the seller shop.
URL (URL for the Mirakl environment (e.g. https://dev-new.mirakl.net). |
|
| Woocommerce | WooCommerce is an open-source e-commerce plugin for WordPress. It is designed for small to large-sized online merchants using WordPress. Launched on September 27, 2011, the plugin quickly became popular for its simplicity to install and customize and free base product | REST | API Url
API User API Key |
|